

We have plenty of CEMLink6 news to share!
Since our last “What’s New”, the VIM Technologies development team has been busy delivering new features, enhancements, and improvements designed to make CEMLink6 more powerful, efficient, and easier to use.
The continued evolution of CEMLink6 is shaped in large part by the people who use it every day. Feedback from our customers, Support team, and CEMLink Steering Committee helps us identify real-world challenges and prioritize improvements that provide meaningful value. This collaboration continues to play an important role in keeping CEMLink6 aligned with the changing needs of the emissions monitoring industry.
During this period, our development efforts have focused on a wide range of areas—from new tools and user-facing features to improvements in reporting, data management, system performance, and overall usability. Some of these changes introduce entirely new capabilities, while others enhance existing functionality or improve the reliability and efficiency of the system behind the scenes.
For this update, we’ve selected the most significant CEMLink6 features and enhancements released over approximately the past 16 months. While this isn’t an exhaustive list of everything that has changed, it highlights the improvements we believe will have the greatest impact on our customers.
If you are not currently running the latest version of CEMLink6, we encourage you to contact our Support team. We can review your current installation, discuss the features and improvements available to you, and help schedule an update. The best way to reach us is at support@vimtechnologies.com or by calling 1-866-484-6435 for immediate assistance.
With that, let’s take a look at some of the most important new features and improvements in CEMLink6!
Key Enhancements
Regulatory Reporting and Compliance Enhancements
Recent updates continue to expand CEMLink6’s reporting and compliance capabilities, helping users meet evolving regulatory requirements more efficiently.
1. Part 75 EDR Updates - Moved Part 75 EDR Generation
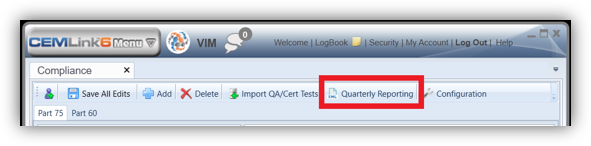
The Quarterly Reporting toolbar button was removed from the Compliance UI.
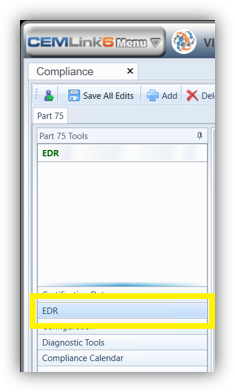
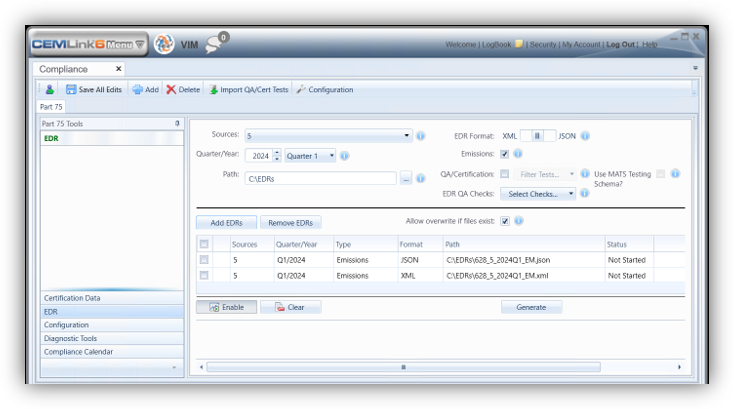
In the Part 75 Tools selection of the Part 75 tab of Compliance, there is a new EDR section. Use this section to generate a Part 75 EDR. The EDR generation still functions in the same manner but has moved to this new location.
2. Use MATS Testing Schema for QA/Cert JSON EDR
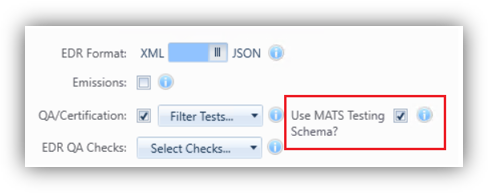
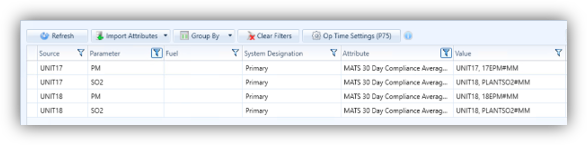
CEMLink6 was updated in this release to include a new option named “Use MATS Testing Schema?” for the QA/Cert JSON EDR. This option is designed to generate a QA/Cert JSON EDR for MATS / ECMPS 2.0 testing. This option is disabled by default. When enabled, certain MATS-only testing elements are included in the EDR output. These MATS-only testing elements include:
Compliance Averages Routine in QA/Cert JSON EDR
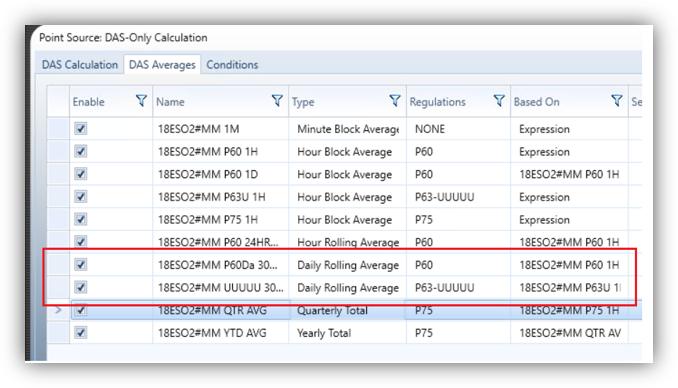
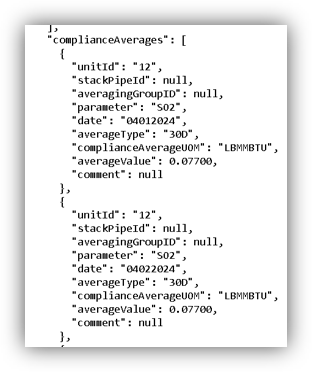
The Compliance Averages routine for the QA/Cert JSON EDR in CEMLink6 was updated in this release to accommodate systems that might be using both P60 and P63-5U 30-day and 90-day rolling averages. In cases where there are multiple averages available, the P63-5U averages are preferred over P60 and used for reporting in the Compliance Averages element.
3. Compliance Calendar
Compliance Calendar is a feature that has been in CEMLink 6 for well over a decade. Despite its age, the 6.2.820 release continues to expand upon the capabilities of this feature.
Without a doubt, there are many areas in Compliance Calendar to highlight. One of its most notable features is the ability to deliver the results of the evaluation through a variety of interfaces. These interfaces include Compliance UI, Overview Dashboards, Excel Add-in, and even a SQL Server database view. This database view provides the ability for “super users” to connect other applications, such as Power BI, directly to the Compliance Calendar results for producing custom reports.
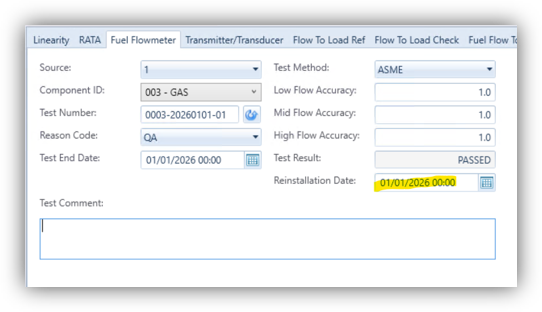
One particular enhancement was made to the Compliance Calendar SQL Server database view by adding the FFACC Reinstallation Date column, making it available in these external applications.
While there are no notable Compliance Calendar UI changes for this request, the addition of this information will help our “super users” with their reporting needs.
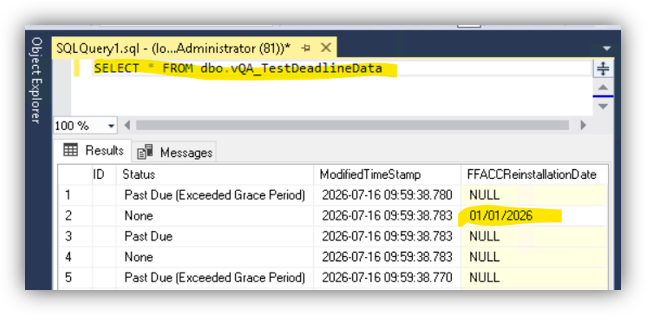
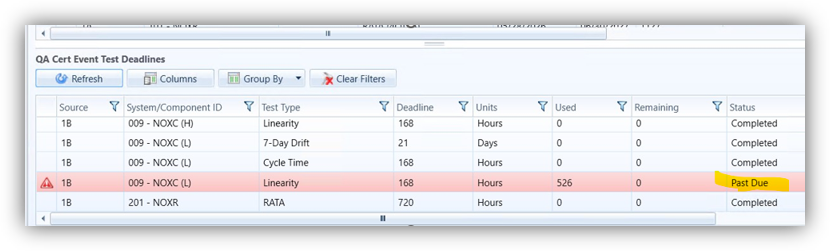
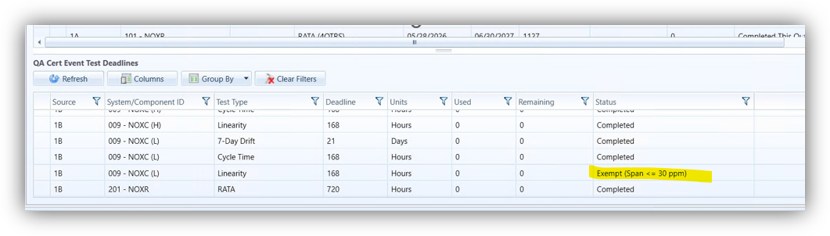
At the same time, the 6.2.820 release of CEMLink 6 also addresses an inconsistency between how Linearities are handled in the QA/Cert Event Deadlines interface and how Compliance Calendar handles them for ongoing QA. This inconsistency is specific to NOx and SO2 Linearities that are exempt when the span is <= 30 ppm. This has always worked for Compliance Calendar, but not for QA/Cert Events. With this release, the results of these evaluations are now marked consistently with Compliance Calendar. They were previously marked as Past Due and are now marked as “Exempt (Span <= 30 ppm)”.
Calculation Processing and Activity Visibility
Several recent enhancements focus on improving calculation performance and providing users with better visibility into system processing activities.
4. Calculation Check in Compliance/EDR
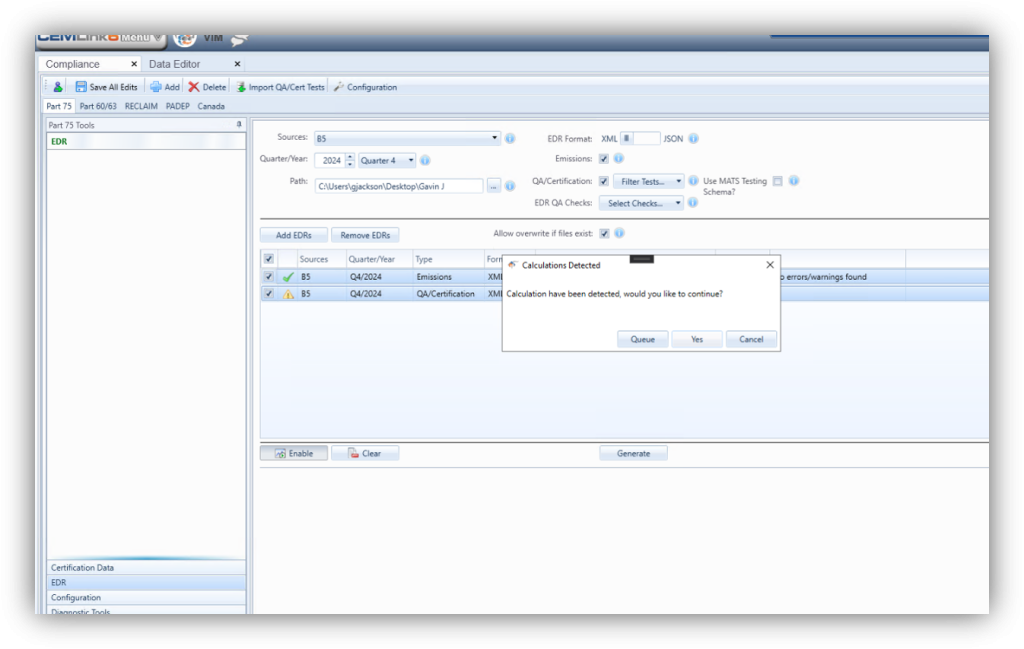
Within EDR tab in Compliance, the system can now check and inform the user when calculations are taking place. Please see an example of the screen below showing when calculations take place in the same source and within the date range.
There are 3 options:
- Queue—Click to start a timer that will run every minute once clicked. It will check to see if calculations are taking place. If calculations are not taking place, the system will run the EDR only if the Compliance screen is still open.
- Cancel—Click to cancel and close the dialog.
- Yes—Click to ignore the calculations and generate the EDR even with calculations detected.
5. Calculation Service Updates – Parallel Calculations
The prior release of CEMLink6 (6.2.575.12) included some significant updates to Calculation Service such as the ability to run calculations in parallel.
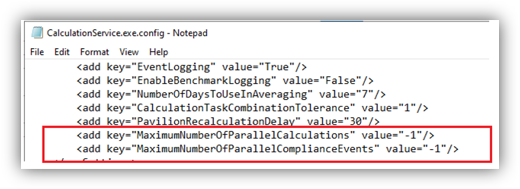
Configuration Settings for Parallel Calculations
Running calculations in parallel has been a huge improvement for most customers. However, we discovered that customers running shared SQL Server instances hosting multiple CEMLink6 databases might not be able to run calculations for all databases in parallel due to the excessive load on the SQL Server. As a result, we decided to add two settings to optionally throttle back the number of simultaneous calculations and compliance events that can run in parallel at any one time. These two new settings are named MaximumNumberOfParallelCalculations and MaximumNumberOfParallelComplianceEvents, and they were added to the Calculation Service configuration file (locate in the CEMLink Services directory). This way, the sites with a shared SQL Server instance will still get some of the benefits of parallel calculations while still allowing for the workload to be balanced across all databases. These settings are set to -1 by default which allows the parallel calculations to run without any limits. The settings can be set to a specific number of calculations or a percentage of the workload (0.00 – 1.00).
Parallel Calculation Level Caching
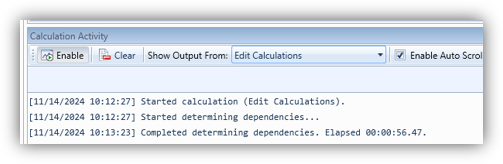
Determining what calculations can run in parallel was something that took time to complete and was resource intensive. Instead of doing this determination “on demand” each time there was a data edit, recalculation, etc., we decided to move this step to happen only once during the Save of the Configuration (or Parsing) and then cache the results. This helped with the speed of the dependency resolution step, which takes place at the beginning of data edits, recalculations, etc.
6. Calculation Activity Task Bar Widget
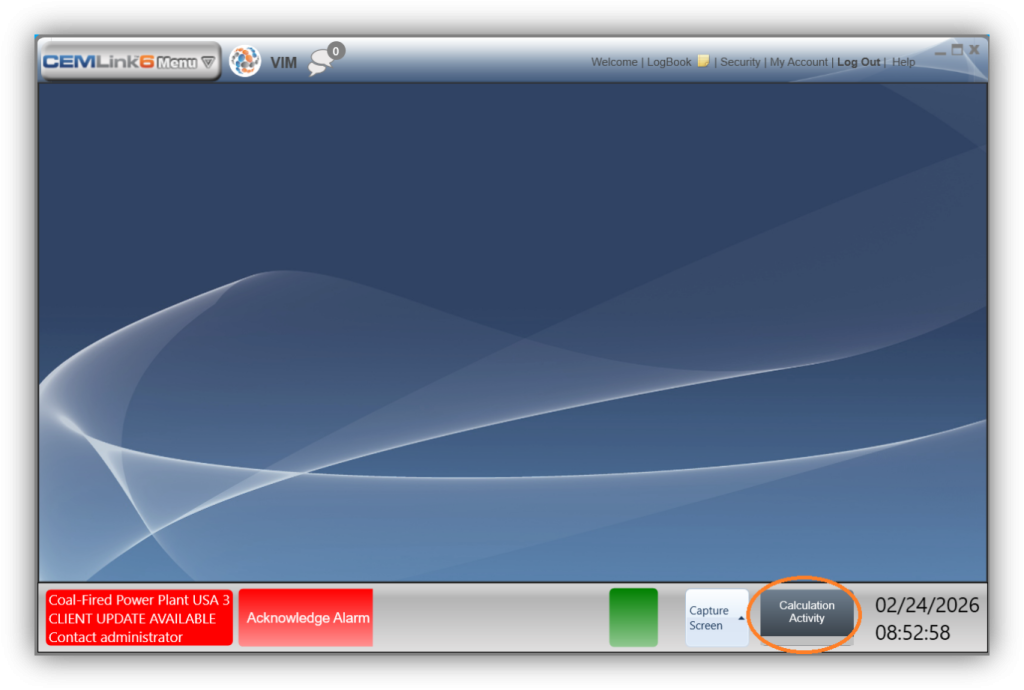
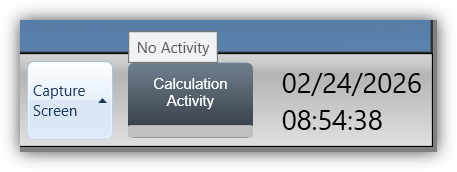
This release introduces a Calculation Activity widget on the bottom task bar of the main CEMLink Client window. This widget provides real-time visibility into background calculation activity performed by the Calculation Service.
Location
The Calculation Activity widget is located in the lower-right corner of the main CEMLink Client window, immediately to the right of the server date and time display.
- Active Calculation State
When calculations are in progress, the widget displays a progress bar indicating current activity.
Hovering over the widget displays detailed progress information, including:
- Percent complete
- Number of calculations completed
- Total number of calculations
- Current calculation progress
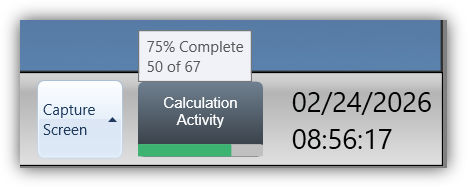
75% Complete — 50 of 67 calculations processed
Purpose and Benefits
This feature allows users to:
- Monitor calculation activity without opening additional screens
- Confirm that calculations are actively progressing
- Identify when calculations have completed
Improve overall visibility into system processing status.
7. Percent Completion in Calculation Activity Monitor
The Data Editor has a Calculation Activity monitor to display scheduled calculations or recalculations as they occur.
The bottom right corner of the Calculation Activity monitor now displays a percentage of completion.
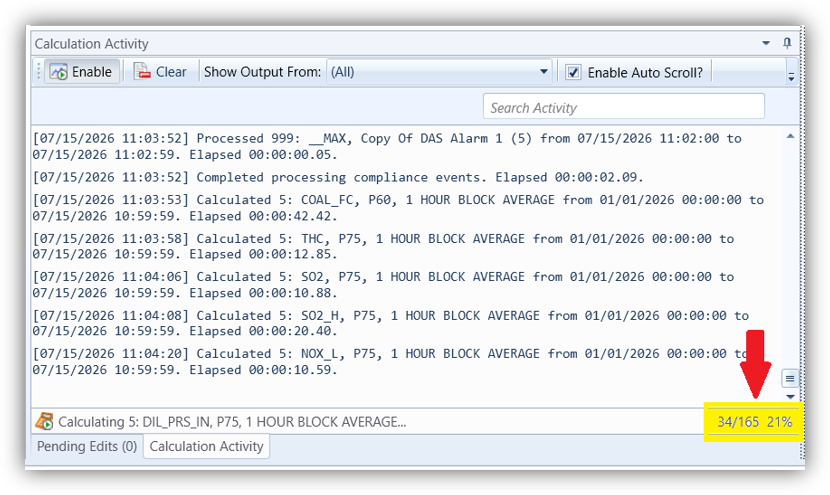
Data Management and Data Quality Enhancements
New data-management tools provide greater flexibility when maintaining databases and managing recalculation activities.
8. Purge 1-minute Data Scheduled Task
Warning!! This task permanently removes data from the database prior to the specified timeframe. You would have to recalculate to recover unintended purged 1-minute data.
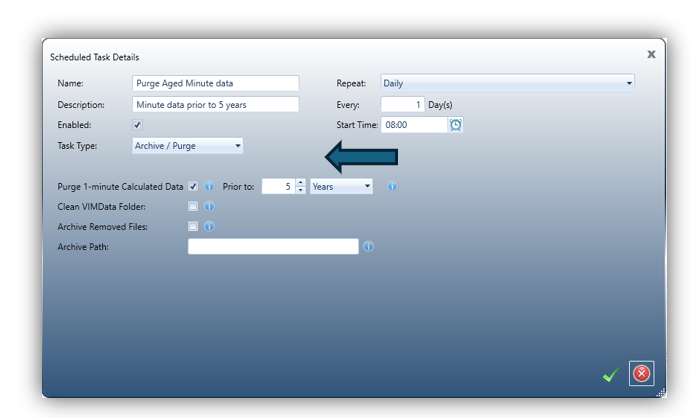
The CEMLink6 Scheduler now includes a feature to create and execute a scheduled task for purging 1-minute calculated data from the system database. This enhancement provides users with more flexibility in managing database growth, potentially improving system performance.
To configure this feature:
- Select Archive / Purge from the Task Type dropdown.
- Check the Purge 1-Minute Calculated Data This enables you to set a lookback period to specify a lookback period. Data older than the selected timeframe will be removed.
The default lookback period is set to 5 years, meaning all 1-minute calculated data older than 5 years will be purged. Please note that raw 1-minute data will not be affected.
9. Data Editor Updates
The Data Editor has been updated to add the ability to recalculate date greater than 1 hour and to check for a ready-only flag is present for one or more data points over a date/time range.
Recalculate Data Greater Than 1 hour
In the latest release of CEMLink6, you can recalculate larger intervals. This change is within the Recalculate Data screen in the Data Editor. Previously, there was no way to focus on recalculating averages and calculations for intervals greater than one hour. For example, this includes daily averages/totals, monthly averages/totals, and quarterly averages/totals. With this change, the recalculate data routine uses the same functionality as before, but now it will cover only intervals greater than one hour. The recalculation details will still be shown and tracked in the Calculation Activity tab.
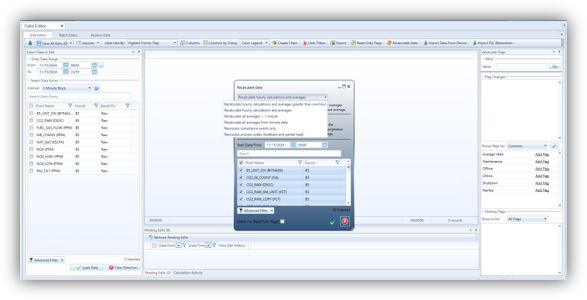
Check for Read-Only Flags
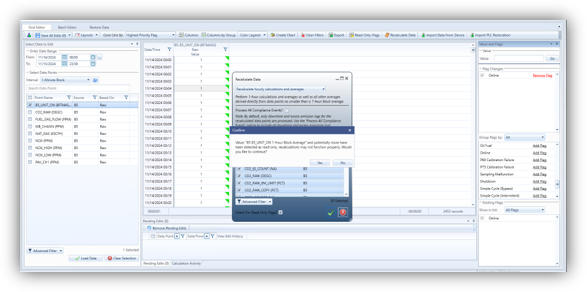
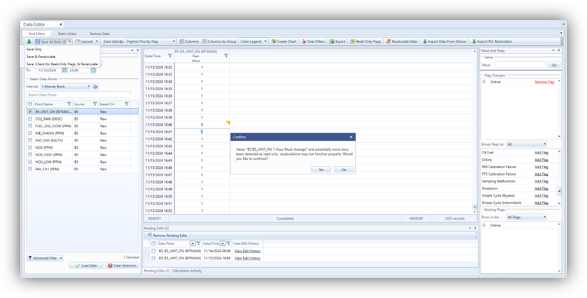
With the latest release of CEMLink6, we have added the ability to detect when a “Read-Only” flag is present for one or more data points over a date/time range. This conveniently happens before data is recalculated. This functionality is available from numerous areas in the Data Editor UI, including:
- Grid Editor – Recalculate Data Dialog, Check For Read-Only Flags?
- Grid Editor – Save, Check for Read-Only Flags, & Recalculate
- Batch Editor – Save, Check for Read-Only Flags, & Recalculate
- Restore Data – Save, Check for Read-Only Flags, & Recalculate
This addition into these areas will help the user to know exactly when there is a “Read-Only” flag present before attempting to recalculate data. Now, the user will know beforehand and can take any additional steps to remove the “Read-Only” flags if desired.
If ‘Save, Check for Read-Only Flags, & Recalculate’ has been selected within any of the aforementioned areas AND there has been a “Read-Only” flag detected, there will be a prompt displaying the data point and if the user would like to continue. The same functionality will take place within the Recalculate Data Dialog, but only if the ‘Check For Read-Only Flags?’ check box has been checked and a Read-Only Flag has been detected.
Operations and Maintenance Enhancements
Several enhancements were introduced to simplify maintenance activities and improve operational recordkeeping.
10. LogBook Entry in Maintenance Mode (Calibration Control)
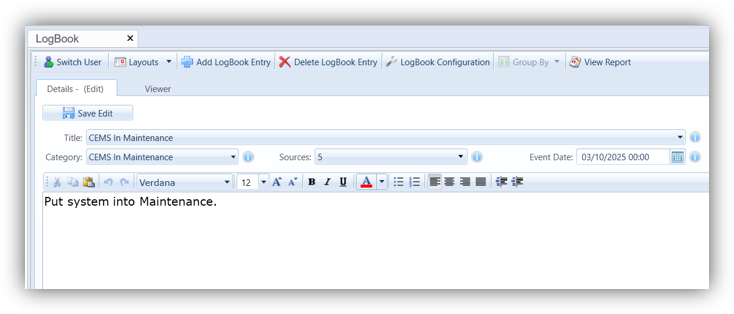
When the DAHS is put into Maintenance mode in Calibration Control, a new LogBook entry is automatically added, if configured to do so.
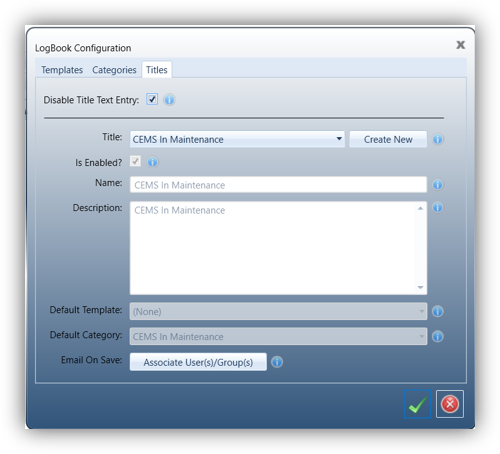
As part of the upgrade, a new LogBook Title, “CEMS In Maintenance”, has been added to the system.
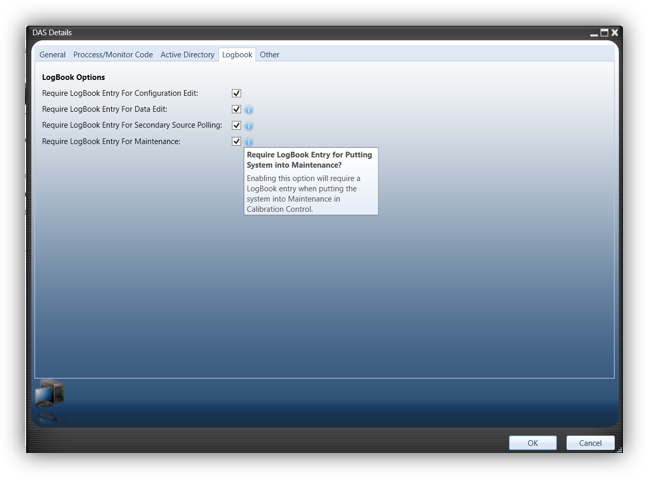
To enable the automatic creation of the maintenance LogBook entry, the option must be turned on in the Configuration UI.
From the Configuration UI, enter the DAS Details dialog. In the LogBook tab of the DAS Details dialog, click on the “Require LogBook Entry For Maintenance” check box. Turning on this option will automatically add a CEMS In Maintenance LogBook entry when turning on Maintenance in Calibration Control.
When clicking on the “Maintenance” button In the Calibration Control feature area, a dialog box will appear allowing for additional comments for the LogBook entry.
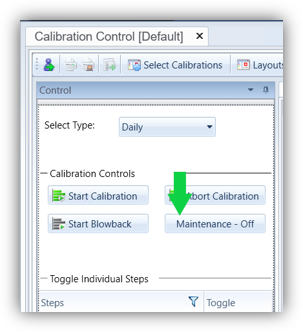
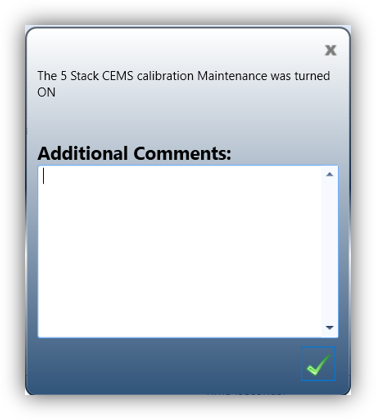
This LogBook entry is only created when turning Maintenance ON.
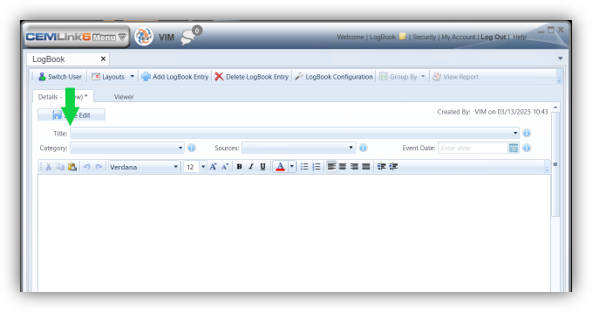
11. Disable the Text Entry for the Title in LogBook
The manual text entry for the Title of a LogBook entry can now be disabled. If this is disabled, a title must be selected from the list of configured titles.
Disabling the manual text entry for the Title is done inside the LogBook Configuration dialog.
In the Titles tab of the LogBook configuration, click on the Disable Title Text Entry check box. Checking this box will disable the manual text entry for the title.
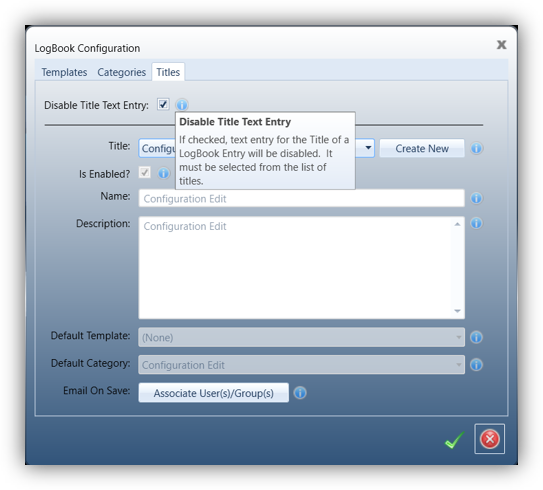
Once this option has been enabled, a Title must be selected from the list of configured titles to save the LogBook entry.
12. PLC Sampling System in Maintenance Alarm Condition
The PLC Sampling System in Maintenance is a new alarm condition that has been added to the system.
These alarm conditions are created for each sampling system when the update occurs. The alarm condition is also created when a new sampling system is configured.
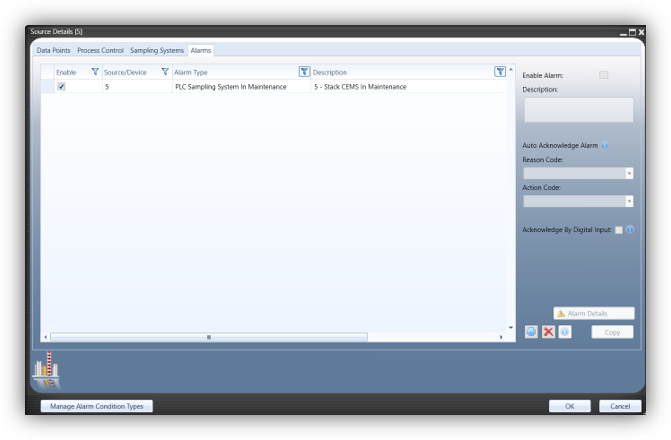
These alarm conditions are created as a Maintenance alarm.
Once created, the alarm condition can be modified by the user as necessary.
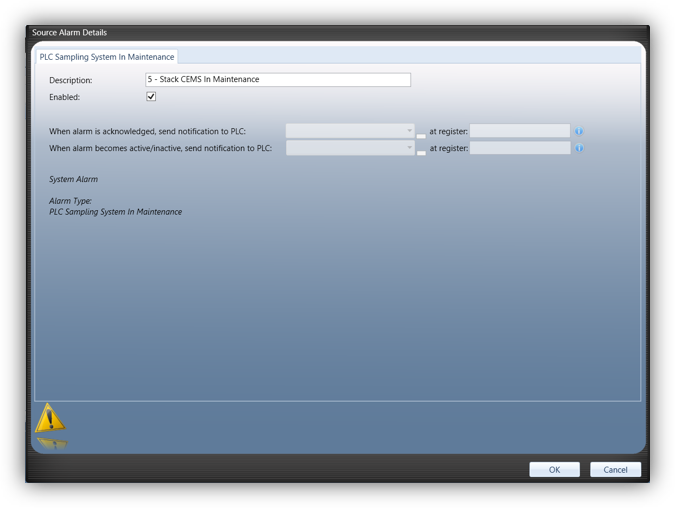
This alarm condition monitors the Sampling System Maintenance bit in the PLC for the corresponding Sampling System number.
Operational Visibility and Monitoring
These enhancements provide users with additional insight into equipment status and system conditions.
13. Cylinder Pressure in Activity Tab in Cylinder Management
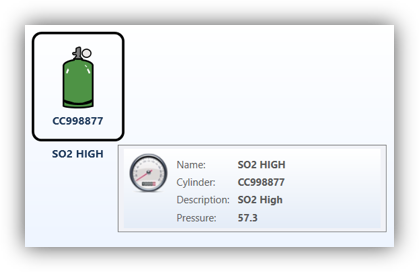
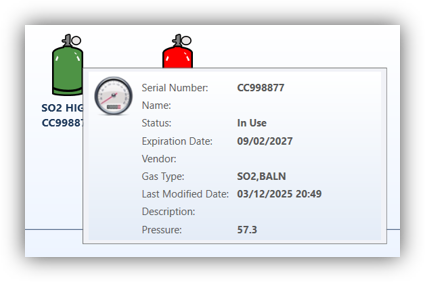
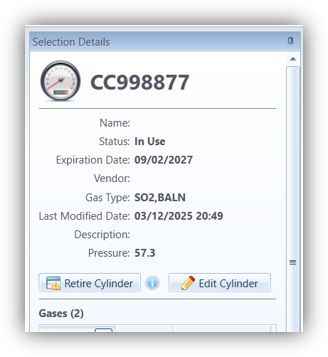
The pressure reading for a cylinder can be displayed in the Activity tab of Cylinder Management.
To display the cylinder pressure in the Activity tab, you must configure a data point indicating the pressure value for the cylinder for a Location. In the Locations tab, select a Location. The Low Pressure Indicator must be switched to “Analog Reading.” Once “Analog Reading” has been selected, the Low Pressure Analog Reading option with a list of data points is visible.
Selecting a data point for the Low Pressure Analog Reading will make the Pressure value visible in the Activity tab when a cylinder is in service within the Location.
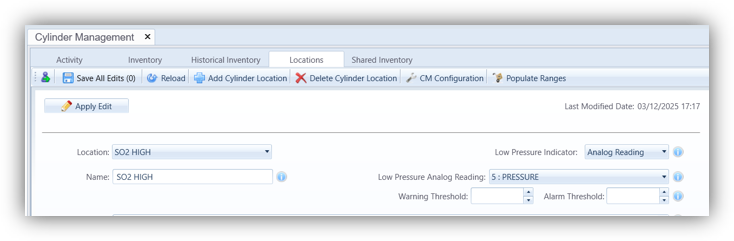
The data points available in the pick list are averages that are 1 MINUTE BLOCK averages with a Validation of NONE.
The Activity tab retrieves the most recent average from the database to display as the Pressure value for the Cylinder.
The Pressure will be visible when a cylinder is in service in the configuration Location.
14. Overview Dashboard Real Time Display Widget Display Status
Two new display options have been added to the Real Time Display Widget in the Overview Dashboard.
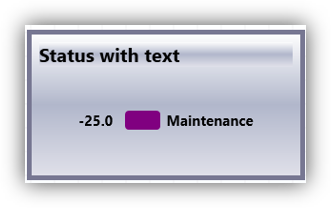
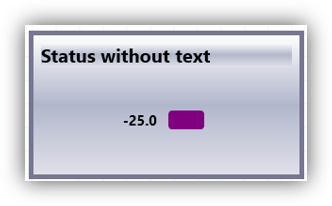
Show Point Average Status and Show Point Average Status (without text) are the new options.
These new options, as well as the existing display options, have been combined into a drop-down list of options to select.
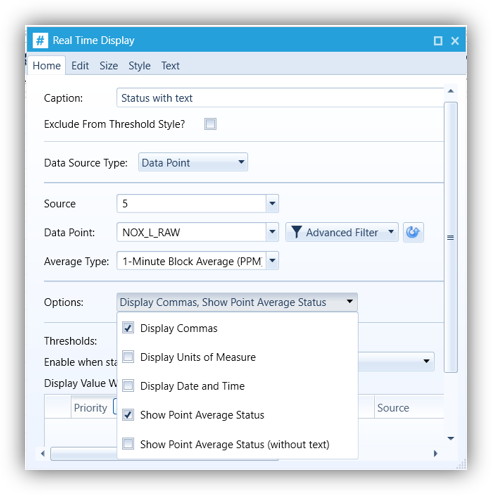
The Show Point Average Status option will display the color-coded Quality of the data point reading. This option will also include the text of the Quality next to the color-coded indicator.
The Show Point Average Status (without text) option will display only the color-coded Quality of the data point reading.
Security and Reliability Enhancements
Recent releases also include improvements designed to strengthen system security and reliability.
15. CEMLink Services Port Blocking
This release introduces automatic port reservation (port blocking) for all CEMLink Windows services to improve service reliability and prevent startup failures caused by port conflicts.
Background
CEMLink Windows services communicate with each other using WCF over a defined set of TCP ports. These ports are used exclusively for internal communication between services running on the CEMLink DAS Server, and the traffic does not leave the server.
The ports reserved for CEMLink services include:
55101–55103
55201–55202
55301–55302
55401–55402
55501–55502
55601–55602
55701–55702
55801–55802
55901–55902
Issue in Previous Releases
In some scenarios, particularly after a server reboot, Windows could assign one of the required CEMLink ports to another application before the CEMLink services started. When this occurred, the affected CEMLink service would fail to start because its required port was already in use.
This could result in:
- One or more CEMLink services failing to start
- Loss of system functionality until manual intervention
- Additional troubleshooting and service restarts
Enhancement in This Release
This release automatically reserves the required CEMLink service ports at the operating system level. This prevents other applications from using these ports and ensures they remain available for CEMLink services.
Benefits
This enhancement provides the following improvements:
- Prevents port conflicts with other applications
- Improves service startup reliability after server reboots
- Reduces risk of service startup failures
- Improves overall system stability
- Eliminates the need for manual port conflict troubleshooting
User Impact
No user action is required. Port reservations are applied automatically during installation or upgrade.
16. Emails Sent with Authorization from OAuth 2.0
CEMLink now has the capability of using OAuth 2.0 authorization to send emails.
OAuth 2.0, which stands for Open Authorization, is an authorization framework designed to allow applications to securely access resources by other web applications on behalf of a user.
If enabled, CEMLink will use this authorization method to send emails via Online Exchange (Office 365).
To enable OAuth 2.0 authorization within CEMLink, the user must turn this feature on in the Security UI and Email Settings tab.
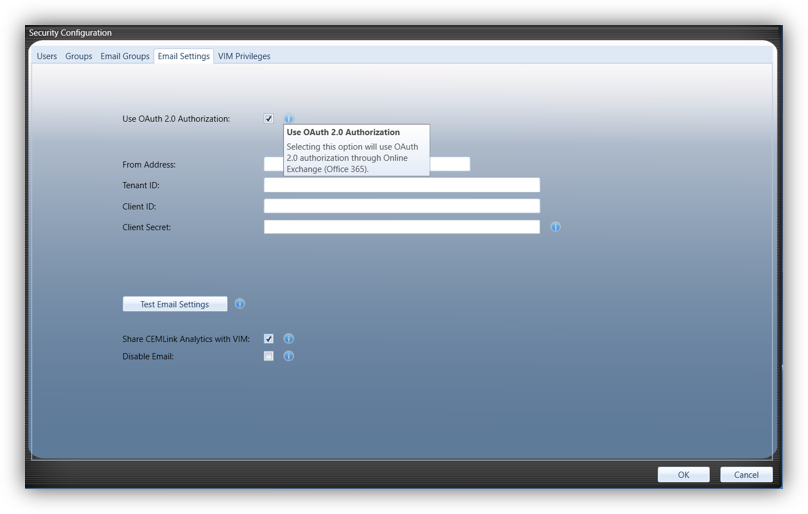
To send an email via Online Exchange using OAuth 2.0, you must first register your application (Exchange) in the Microsoft Entra admin center and grant it the necessary API permissions to use the modern authentication protocols. Users will need their IT department to help determine the user, IDs and secret key needed for authorization.
To authorize an application to send emails on behalf of a specific email address (the “From” address) using OAuth 2.0, you must explicitly associate your authorized OAuth client with that specific user account to get the necessary permissions.
An OAuth 2.0 Tenant ID is a unique, alphanumeric identifier (e.g., abc12345-6789-0abc-def1-234567890abc) used primarily in Microsoft Entra ID environments. It specifies the exact directory, organization, or customer environment your application is authenticating against ensuring users only access authorized resources.
An OAuth 2.0 Client ID is a public identifier issued by an authorization server to identify a specific application.
An OAuth 2.0 client secret is a private “password” known only to your application and the authorization server. This client secret key is generated in Microsoft Entra and will expire depending on duration set during the key creation process. When this key expires, a new key will need to be generated and input into the CEMLink settings.
Learn More
The enhancements highlighted in this article represent some of the most significant improvements delivered in recent CEMLink6 releases. Additional updates, implementation guidance, and technical details are available through the CEMLink6 Release Notes.
If you are not currently running the latest version of CEMLink6, contact the VIM Technologies Support Team at support@vimtechnologies.com or call 1-866-484-6435 to discuss available upgrade options and enhancements.


